Walk-through - Creating a Microsoft Access Stock Control Database
If you would like to try and create your own stock control database then read on...
In this article we'll guide you through some step-by-step instructions for creating your own stock management database or stock control system in MS Access. We have also included some hints and tips based on our many years of experience creating Access databases for real businesses. To download the database we'll be making in this tutorial for free, click on the link above. You can also follow this tutorial using our YouTube video that explains each step and provides demonstrations to help you do it yourself; click on the link above to open the video in a new tab/window.
FREE ACCESS STOCK CONTROL DATABASE SAMPLE DOWNLOAD
Before you get startedPlease note that in order to follow this walk-through, or run the free finished database linked above, you must have a full version of Microsoft Access installed on your computer.
Plan
It might sound obvious, but one of the most important points when
creating your stock control database is deciding exactly what
you need it to do, and what it is for. Getting the design
right is much easier once you understand the purpose of the
database. A well-designed database will be simpler to
maintain, and to adapt later on if your requirements alter.
For example, the simple database we are creating needs to be able to:
- Log orders from customers
- Track stock levels
- Warn when parts need to be re-ordered
Think about the details of the way your business works. Does each customer order one type of item at a time, or do your customers order a range of parts or items from you all at the same time? Do you have just one supplier for each part you stock? Do you order a range of items from each supplier or does each supplier just provide you with one type of item? Your design will also be different if you stock items for manufacturing rather than to sell on. Keep the answers to these questions in mind as we go into the next step.
Define the tables required
Information
in a database is held in tables. By this point you should have some
idea of the
information the database needs to hold to achieve your
goals. You need to categorise
this information into a set of tables. To start with you don’t
even need
to do this in Access, just make a list by hand or in another program.
The tables within our example database are: Parts, Customers, Orders, PartTypes, PurchaseOrders and Suppliers. To keep things simple, we are going to assume that each customer orders just one part at a time, and that we order just one part from a supplier at a time. Of course this might not be true for you; your customers may order a whole selection of items together, and you will probably buy a range of items in one go. In this case you’ll need a table that holds all the parts linked to each order, probably called Order Items.
We’ve made a similar sort of assumption about customers, assuming they are all individual people or small companies; for large business customers with multiple addresses or phone numbers to store you would perhaps need a more advanced set of tables to hold all the information consistently. But all this is a more advanced topic really, so we’ll just show you the simple way for now using tables with more basic goals.
Set up fields within the tables
Within
a
table, information is held in “fields”. Basically a field is
the specific
piece of information about the thing the table is responsible for.
Typical
fields in the Parts table for example might be PartNumber,
PartDescription,
Supplier and StockLevel. If you picture a table as a tabular grid,
then the
fields would be the column headings, with each row representing an
entry in the
table, or record.
All tables should have a unique identifying field called the primary key that cannot be the same for any two records or ever be empty. So in our parts table, the PartNumber is unique for each part and every part has one so we can just use that. But for other tables where this may not be the case, we can invent ID numbers or codes for internal use in the system to make sure it can uniquely identify any entry in any table. In Access there is something called an auto-number field that you can use as the primary key if there is no other obvious choice or preference, which just assigns a new sequential number to each record in the table.
For each field in the table, you need to pick a data type to show the type of data it will hold, such as Number, Text, Date/Time or Currency. Within each type you can further specify the exact nature of the data, such as the number of characters for a Text. You might already use part numbers within your business, and the format you use is likely to help you decide the data type for the field Part Number. Your part numbers might be something like ACBD2222, in which case you might choose to use an 8-character text string.
Now we’re going to imagine that our business deals with large numbers of different parts which we classify into different types. We have a table called PartTypes, which lists the different types of Parts. We want to make our Parts table have a field that can link to the PartTypes so that each part can be assigned a type. The field in the parts table needs to the same as the primary key field (the thing that identifies the record to the system) in the PartTypes table, which we’ve made a 1-character code. The Parts table would also be related in a similar way to the Suppliers table, so that you can find out who supplies a particular part.
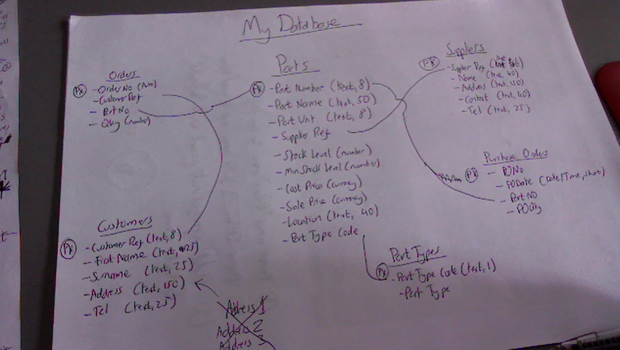
Making our design on paper.
Think about how you will be using the fields, and make sure you define them in the most logical way for your purposes. For example, it can make sense to store people’s names as First Name and Surname separately rather than as one field so that you can easily sort and list names in alphabetical order (of surname). A tip we find useful is to hold postal addresses as one field, rather than split them into individual elements of the address such as Address Line 1, Address Line 2, Town, County and Postcode. This makes it much easier to incorporate addresses into forms and reports, and it eases data entry because Access is happy to store the multiple lines in one field.
While thinking what fields you need, you should make sure they all have unique names, unless two fields actually contain the same information. Only in this case should you give them the same name, like with PartTypeCode earlier. Something to keep in mind with your names is that if you want to progress to using SQL queries or Visual Basic for Applications (VBA) code with your database, you will find life easier if you have no spaces in the table names or field names. So that is why we’ve been writing PartTypes as one word, rather than having the space.
Another tip to keep in mind is that is it bad practice to give a field a name that is already being used behind the scenes by Access for something else. These so-called ‘Reserved Words’ include things like ‘name’, ‘date’, ‘level’ and ‘money’, among many others. You can look up a full list of Access’s reserved words online to make sure none of your fields use one. This can help avoid confusion in the database engine between predefined words and your field names, which if left unchecked can sometimes cause serious errors.
Create your tables in Access
To create a Parts table and define its fields:
- In Microsoft Access 365/2019/2016/2013/2010/2007 click on the Create tab on the Ribbon, then on Table Design. This opens a new table in design view. Each row in design view represents a field in the table. (In Access 2003, click on Tables in the list of Objects then click the New button which opens a dialog box called New Table. Finally select Design View, and click OK.)
- Click in first column, top row.
- Enter the name of the first field (PartNo)
- Use the Tab key to go to the next column where we define the data type. Click the drop-down and select Text.
- Use the Tab key to go to the next column, and enter a description for the new field.
- As this will be the primary key for the table, click the primary key button on the toolbar.
- On the General tab, at the bottom of the window, click in the Field Size row, and enter 10 to define a text string with 10 characters.
- On the General tab, click in the Caption row, and type the label you want for this field on-screen (e.g. Part Number).
- Click in the second row to define the next field in the table. And so on.
- When you have finished adding fields to the table, close it by clicking on the X in the top right hand corner. Access will ask you to name the table. Enter “Parts”.
The Parts table of our example stock control database contains the following fields:
|
PartNo |
10-character text string |
Unique part number to define each part |
|
PartName |
50-character text string |
Name/description of this part |
|
PartUnit |
20-character text string |
The unit of measure for this part e.g. Kg, Meters, box of 10 |
|
SupplierRef |
6-character text string |
The supplier of this part |
|
StockLevel |
Integer |
The number of this part in current stock |
|
MinStockLevel |
Integer |
The minimum number of this part in stock before you need to re-order |
|
CostPrice |
Currency |
The cost price of this part |
|
SalePrice |
Currency |
The sale price of this part |
|
PartType |
1-character text string |
The type of part this is |
|
PartNotes |
255-character text string |
Tip : it is often useful to include a Notes field for any other information that you might want to add later. |
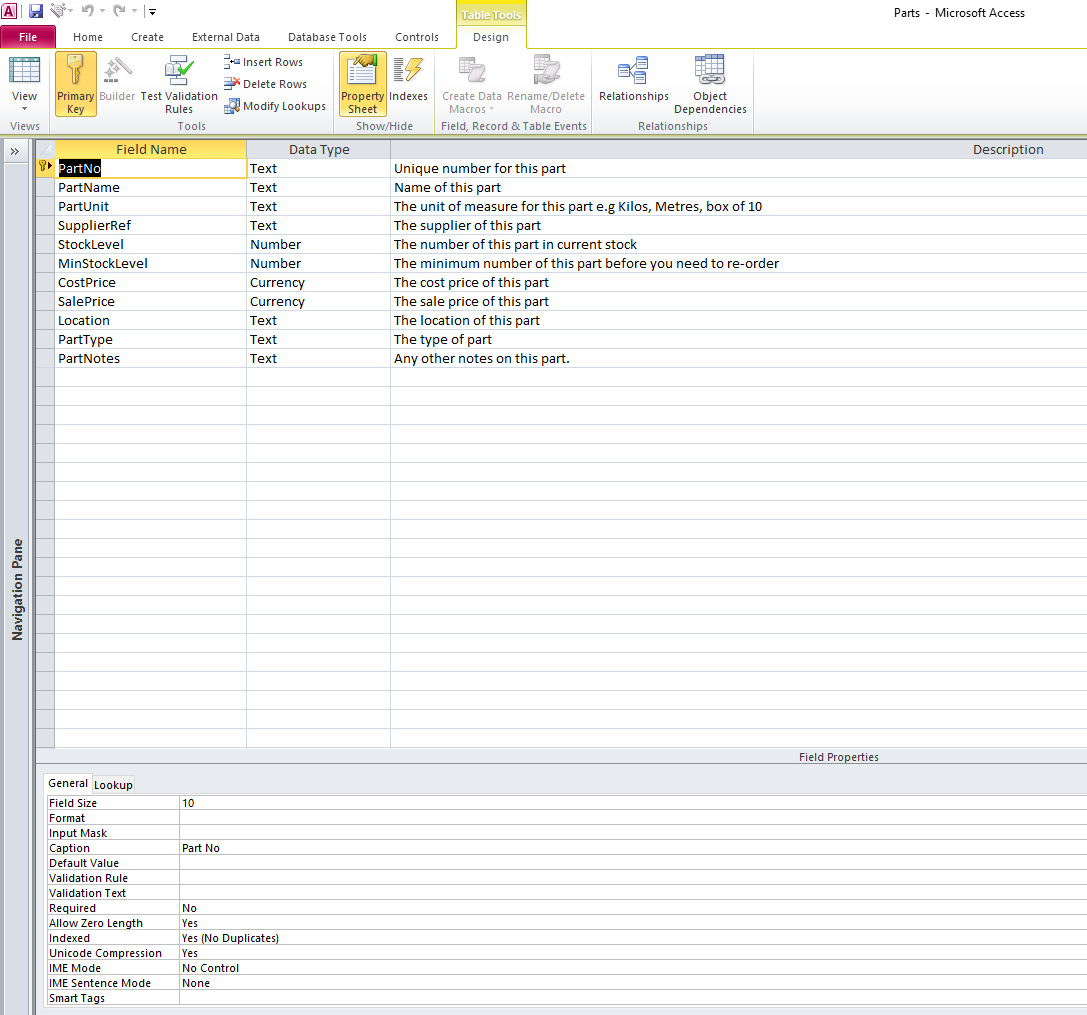
The Parts table in Design View (Access 2010)
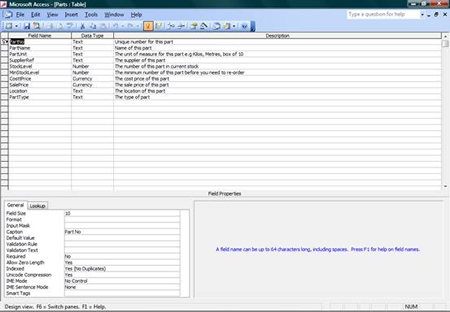
The Parts table in Design View (Access 2003)
The screenshots above show the Parts
table from our stock control database in Design view. Using
Design View enables you to define all the fields in your table, specify
their Data Types, describe them and define their format.
Tip – Do complete the Description of the field. When you use
the Form Wizard to create forms for you later, this description will be
displayed in the status bar to help users.
Tip – If your field has an abbreviated name, or has no spaces in it,
use the Caption area to write its name in plain English. This caption
will then appear on forms produced by the Form Wizard. For
example if your field is called POQty, enter Quantity in the caption.
The Customers table is as follows:
CustomerRef |
8-character text string |
Unique 8-character reference for this customer based on first 4 letters of surname (e.g. SMIT0001). This will make it easy to find individual customers. This field is the primary key. |
|
CustomerFirstName |
20-character text string |
The first name of this customer |
|
CustomerSurname |
25-character text string |
The surname of this customer |
|
CustomerAddress |
255-character text string |
The address of this customer |
|
CustomerTel |
15-character text string |
The telephone number of this customer |
The Customers table above is designed for a business whose customers are predominantly individuals as assumed earlier. When your customers are mainly larger businesses, and you may have several contacts at each business, or each business might have several sites, then you will need a more complex solution.
Once you've got the hang of it, go through the rest of your planned tables setting them up too. You’ll see your new tables appearing in the object browser on the left as you make them (press F11 to bring this browser up if you can't see it).
Relationships
Relationships are set up within the database, to show the way in which
one table relates to another. A one-to-many relationship is
the most common kind of relationship. In this relationship, a
record in one table can have more than one matching record in a second
table, but each record in the second table can have only one matching
record in the first table. For example, each Part can have
only one Part Type, but for each PartType there are likely to be many
parts of that type.
If each part has only one supplier as in our example, then this is another straightforward one-to-many relationship. If each part can be supplied by several different suppliers, then you will need a different design.
In our example database, the following relationships between tables are required.
Suppliers - Parts, to specify the supplier of each part.
Parts - PurchaseOrders, showing the part ordered on a purchase order.
Parts - Orders, showing the part ordered by a customer.
Customers - Orders, showing the customer for each order.
PartTypes - Parts, classifying each part into a particular part type.
As an example we’ll show you how to set up the relationship between the tables Parts and PartTypes. Before you start doing relationships it is a good idea to write some sample information into your tables that features entries which are as long as you think you’ll ever use. This will help out a little with some settings you’ll need to adjust later.
- Set up the field PartTypeCode in the Part Types table as a single-character text string defining the part type.
- Make this field the primary key
- Open the Parts table in Design view.
- Add a field PartTypeCode to the Parts table. Make sure it is also a single-character text string.
- Now click in the Data Type column of the Part type field to display a down arrow. Click this to display a drop-down list, and select Lookup Wizard.
- Select “I want the lookup column to look up the values in a table or query”. Click Next.
- From the list of tables displayed, select the PartTypes table. Click Next.
- Click the fields you want included in your lookup column. In this case, we will select both fields. Click Next.
- A sort order can be selected if required. Select Description. Click Next.
- The next step allows you to define the width of the columns in your lookup column and to specify whether you wish the key column (the column containing the primary field key) to be displayed. By default the key column is not displayed, and in our case we just want to view the description, so leave the tick in the box. Now set the width of your lookup column by dragging the edge to the position you require. If you have already entered some data in the PartTypes table this will be displayed to help you to adjust the column to the width of the likely contents. Click Next.
- Now select the label for your lookup column. The suggested label will usually be correct. Click Finish to complete the Lookup Wizard. You will be asked if you want to save the table so that relationships can be created. Click Yes.
- To complete the relationship, select Tools, Relationships, or click the Relationships button on the toolbar to display the relationships window. You will see the Parts table and the PartTypes table with a line linking the PartType field in Parts with the PartTypeCode field in PartTypes.
- Right mouse over this line, and choose Edit Relationship (or double click on the line). Tick the Enforce Referential Integrity box. You should always tick this as otherwise the relationship has little value. For example if you have defined three different part types in the Part Types table: E – Electronics, S – Software, H – Hardware, ticking the Enforce Referential Integrity box will ensure that you will not be able to define a new part as any part type other than these. Also, if you try to delete a part type from the PartTypes table, when parts in the Parts table have this part type, the database will warn you.
- Tick the Cascade Update Related Fields box. This means that you can change the primary key in the primary table (e.g. the PartTypes table), and it will be automatically updated in the related table (Parts).
- The third box is Cascade Delete Related Fields. Ticking this means that if you delete a record e.g. Software, from the primary table (e.g. PartTypes), then any records in the related table (Parts) with that part type will be deleted too. Normally you would not want this to happen – if you had parts of type Software in the Parts table then you would not want to delete that part type, so leave the box unticked. There will probably be examples in your database where you do want to tick the Cascade Delete Related Records box. It normally applies when one table forms supplementary information for another – for example if you had Orders and OrderItems tables (listing multiple items on an Order), then you would want to delete all OrderItems if you deleted an entire Order.
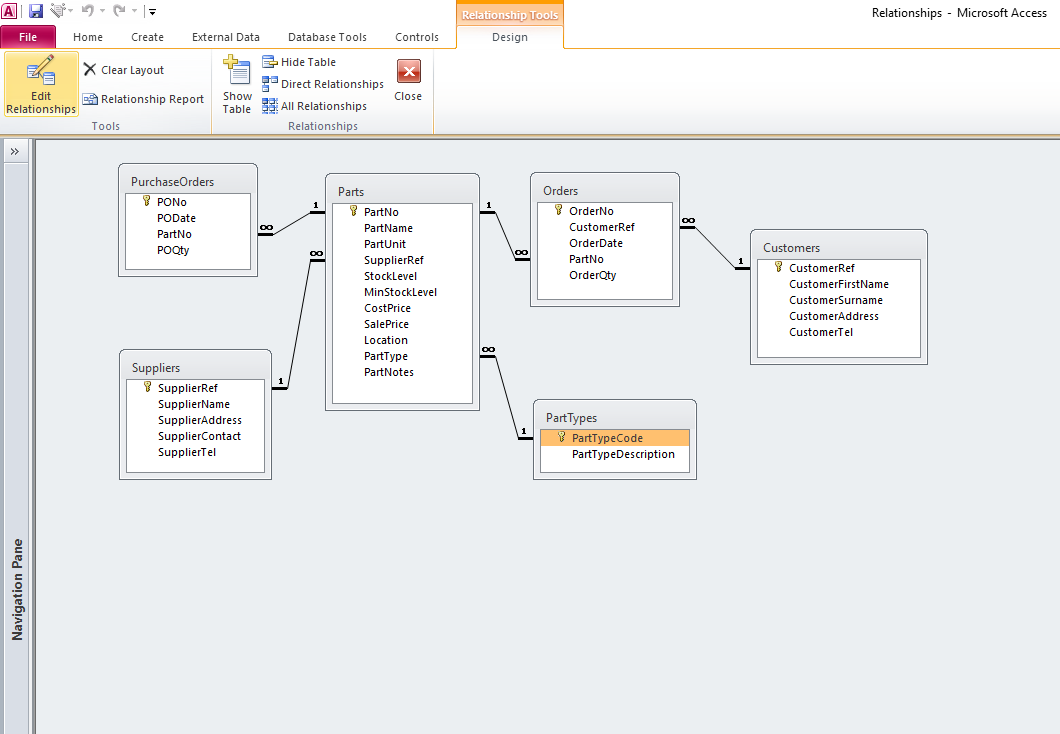
The Relationships Window in Access 2010
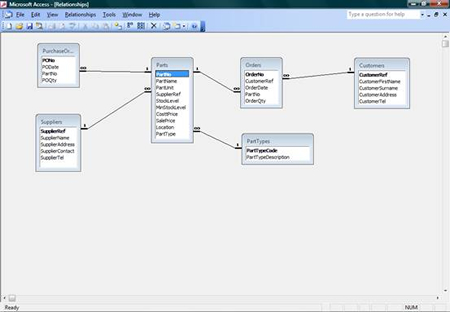
The Relationships Window in Access 2003
So now you’ve seen how to set up a relationship, you should now go through the tables setting up the relationships you had planned in your design. Once you’ve done them all we can move onto the final part of our database.
Creating a reorder query
In
general queries are used to extract data and information from your
database.
In our example we want to know whether we have less than the minimum
stock
level for any parts, so that we know when you need to order
more. You can
extract all sorts of other information with queries though. You might
want to
know all the parts supplied by a particular supplier, or how often a
particular
customer ordered last year. Often you will extract the
information using
a query and then use an Access report to present the data in a clear
way, but
here we’ll just be doing the query.
So now let’s go through how to set up a query to show which parts are below their minimum stock level, and tell us the suppliers from whom they should be reordered.
To set up a query to show which parts are below their minimum stock level, and the suppliers from whom they should be ordered:
- In the Create tab, click Query Design (Access 2013/2010/2007). Or in Queries click New, then select Design View and click OK (Access 2003).
- In the Show Table box, select Parts. Click Add. Select Suppliers. Click Add. Click Close.
- The Query Design grid is now displayed with the chosen tables above. Fields to be included in the query are added by dragging them from the table to the grid, or double clicking on them.
- The fields we require are PartNo and StockLevel from the Parts table, and SupplierName and Address from the Suppliers table, so select these.
- We only want to display parts whose stock level is less than the minimum stock level for this part. This is done by setting a criterion for this field. Enter <= [MinStockLevel] in the criteria row of the Stock Level field (column).
- Click the X in the top right hand corner of the window to close the query. Access will ask you if you want to save changes to the query, and will ask you for a name for the query (e.g. LowStockLevels)
- Now double click on the query you have just created, to view the parts with low stock levels.
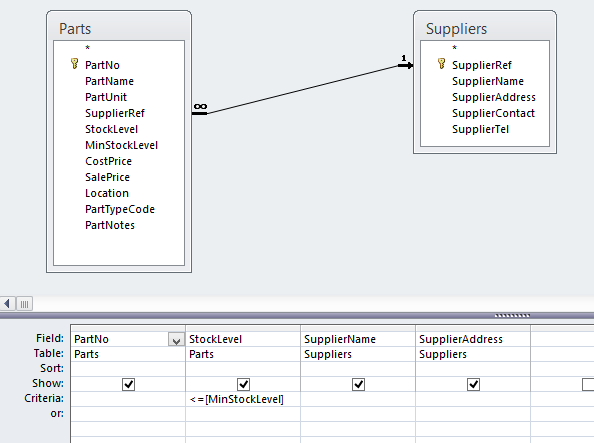
The query design grid in Access 2010 (same as Access 2013, Access 2016, Access 2019)
The query should be visible in the object browser on the left. Double click on the query to view the parts with low stock levels once you have some working data in the system.
One more thing about the query: the lines between the tables in the query dataset are called Joins. Joins are automatically created between tables when there are fields that already have a relationship between them or between a primary key and another field with the same name. Usually you would want a join here, but there will be cases where you don’t want to join these fields for various reasons, so keep in mind that you may need to check all the joins once they are created.
Join Properties in queries are very important when your query uses more than one table. If the query does not seem to give you the results you expect, check these by right-clicking on the line joining the two tables in Design view. Here you can choose whether you only want to see parts that have a supplier, or all parts with low stock regardless of whether they have a supplier (by picking “Include all records from ‘Parts’ and only those records from ‘Suppliers’ where the joined fields are equal.”). You might want to use this option in this example. The 3rd option is the reverse of this, so show all suppliers even if they don’t supply any low stock parts, which in this case wouldn’t make any sense, so just ignore that one.
So now we have completed the database as per our design. We can enter all the data we need and it will tell us when to reorder products. Of course the potential uses of a database are many, so now we’re going to discuss briefly a few ways you might want to expand on this database to make it more useful and more user-friendly.
Next Page >If you decide that building your own stock control database is not for you after all, we at Software-Matters are happy to offer advice about alternatives via our free initial consultation. Contact us on 01747 822616 or fill in an enquiry form here and we will get back to you.
If you enjoyed this article or found it useful, why not tell others about it?![]()
Software-Matters is a UK software development team specialising in Microsoft Office and based in Gillingham, Dorset, and close to the county borders of Somerset, Wiltshire and Hampshire. Nearby cities include Bournemouth, Poole, Southampton, Bristol, Bath and Salisbury.


